Background
These days, I often use ESP32 processors as embedded IoT systems. But the developers working with me often ask me to have a software system upgraded via Wi-Fi. At the beginning, I can write a new software via UART-USB, as a target board is being developed and there is enough room to connect UART cable. But as a project goes on, the mechanical shape of an IoT machine has been fixed and the ESP32 board has been put out of reach from me. That’s why OTA update is the only way to update software.
Sample of ESP32 OTA update
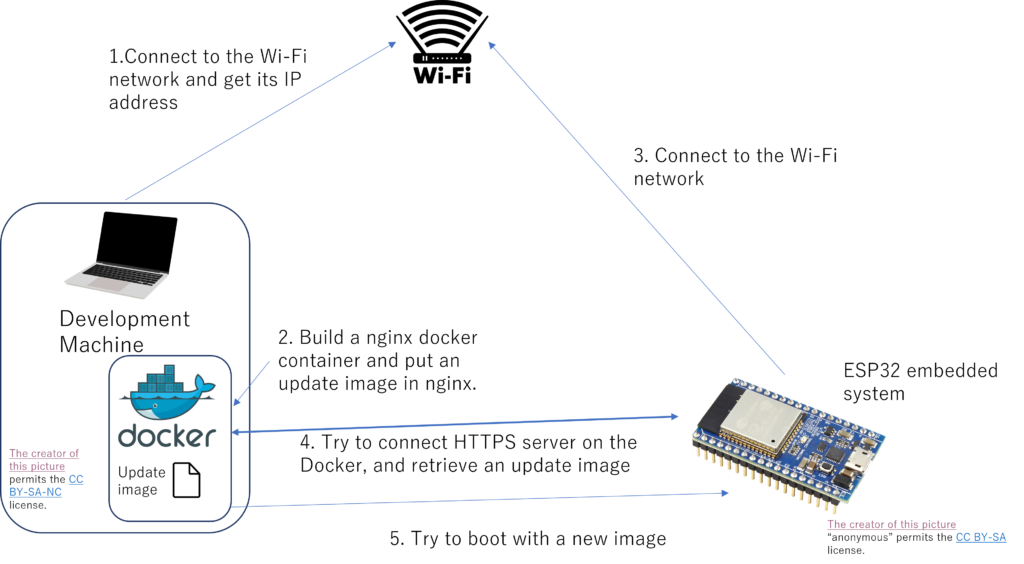
The sample of ESP32 OTA sample itself is published from the espressif corporation. In this sample code, it retrieves the latest version of software via HTTPS and boot up with the latest version of it. If the bootstrap of the latest version fails, it is regarded as incorrect update and the system tries rolling back the previous version of software, while if the system can run the bootstrap of the latest version of software it can run the latest version after that. Basically, the slightly modification of this sample code might achieve what I want to do.
Building a HTTPS Web server as a Docker container
To achieve the software update procedure, you need to build a HTTPS Web server. It’s easy for us to build it with Docker container such as apache and nginx (You can also achieve the procedure using WSL2, but judging from my experience, an openssl server on WSL2 isn’t so stable).
Private/Public keys for SSL Certification
If you want to upgrade the software in ESP32 processor via HTTPS, you will need to prepare your private SSL certification. In my case, as I use my PC as a developing machine that’s why I’ve installed “Git for windows“. Git for Windows luckily contains the openssl program which can generate your private and public keys, so I executed it and tried creating these keys.
openssl req -x509 -newkey rsa:2048 -keyout server_key.pem -out server_cert.pem -days 365 -nodes
This program asks you for which you work and your e-mail address, but don’t worry. You just have to input appropriate ones, except for the CN, according to the configuration of the program in an ESP32 processor.
Docker Desktop for Windows
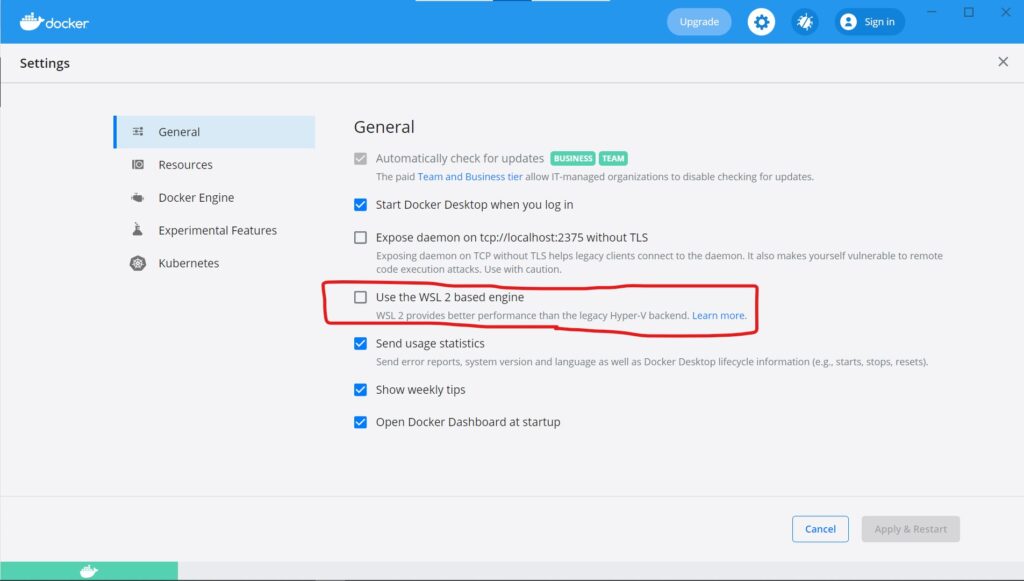
I’ve installed the Docker Desktop for Windows (as of September 4, 2021, version 4.0.0 is released). Since I’m not going to use it for commercial use, I can use the Docker Desktop for free right now.
The Docker Desktop for Windows now supports WSL2 backend, but as far as I know and have been through, it can run more stable than on Hyper-V so far.
A nginx container and some Docker configuration
I use a nginx docker container as an upgrading server with a little modification using Dockerfile and docker-compose.yaml files. The server_key.pem and the server_cert.pem files that were created above section are used because I attempt to execute the OTA upgrade via HTTPS. That’s why I use the Dockerfile in which some copy commands are executed.
FROM nginx

EXPOSE 443

COPY nginx/nginx.conf /etc/nginx/nginx.conf
COPY nginx/server.crt /etc/nginx/server.crt
COPY nginx/server.key /etc/nginx/server.key

CMD ["/usr/sbin/nginx", "-g", "daemon off;"]
In the 3-5 lines of the Dockerfile, Docker tries to copy nginx.conf, server.crt, and server.key in the nginx directory to override the nginx.conf configuration file in the original nginx container. The last CMD line tells the Docker to execute a nginx daemon foreground. In the docker environment, nginx terminated immediately when it begins to run background.
In the nginx.conf file, the root directory and the default communication protocol and the private/public key pair are mainly specified as follows:
worker_processes 2;

events {
    worker_connections 512;
}

http {
    server {
        listen      443;
        server_name localhost;

        ssl         on;
        ssl_prefer_server_ciphers  on;
        ssl_protocols TLSv1.2;
        ssl_ciphers "ECDHE+RSAGCM:ECDH+AESGCM:DH+AESGCM:ECDH+AES256:DH+AES256:ECDH+AES128:DH+AES:!EXPORT:!DES:!3DES:!MD5:!DSS";

        gzip on;
        gzip_types *;

        ssl_certificate      /etc/nginx/server.crt;
        ssl_certificate_key  /etc/nginx/server.key;

        location / {
            root /usr/share/nginx/html;
            index index.html index.htm;
        }
    }
}
The docker-compose.yaml file is as follows:
version: "2"
services:
update_server:
image: nginx
build: ./build/webserver
volumes:
- "./app:/usr/share/nginx/html"
ports:
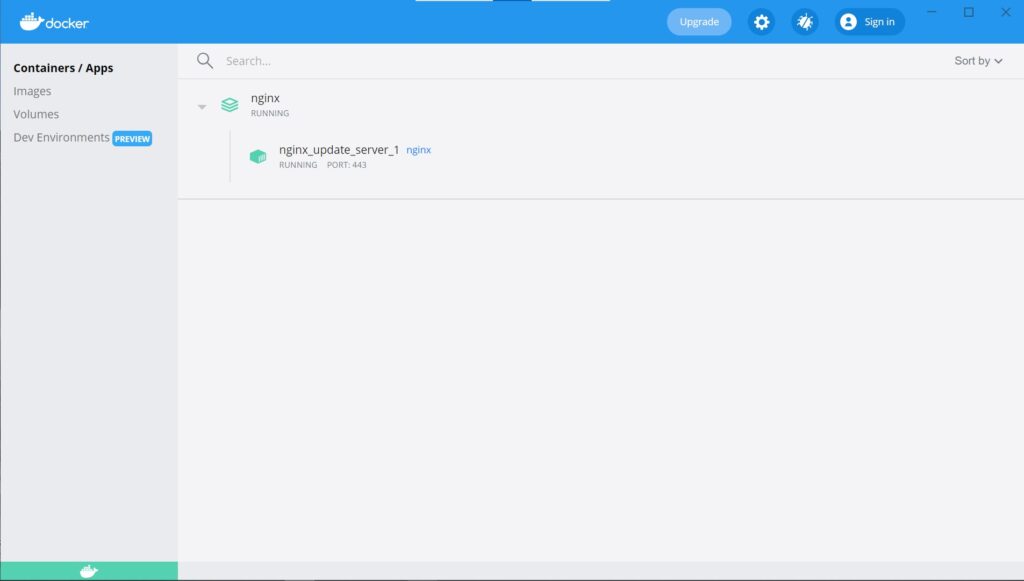
- "443:443Now, when you execute docker-compose up -d, you can see the update_server service is running, exporting the port 443.
Wi-Fi Access Point: Actual Access Point, or Mobile HotSpot?
The PC you have built a HTTPS server might connect to the Internet. But an ESP32 embedded IoT system doesn’t usually need to connect outside Internet environment. So, I’ve set up the Mobile HotSpot which is I think adopted for tethering from smartphones and another PCs. The Mobile HotSpot always assign the virtual access point (i.e., your developing PC) to 192.168.137.1, so I take advantage of this feature when an ESP32 tries to connect a HTTPS Web server for OTA update.
The Mobile HotSpot function by default turns off its Wi-Fi when no connection comes in a specified time. That’s a little annoying so I’m thinking of using the PowerShell script which describes the post.
An updated version of ESP32 firmware
An ESP32 firmware also has to support the OTA update.
Custom Partitions
If you want to support OTA update in your IoT application, you have to at least two partitions which your application program are stored. In order to achieve this, you can build your own partition with the ESP-IDF development environment.
Type at the top directory of your IoT application:
idf.py menuconfigand select “Partition Table” -> “Partition Table(Custom Partition Table CSV)” .
Rollback is required if an illegal and wrong software is installed.
If you permit the OTA update, you also want to rollback the previous software running correctly when an updated version of ESP32 firmware doesn’t run correctly. Go to the top directory of a project and execute idf.py menuconfig.
You can rollback the previous software if you turn on the CONFIG_BOOTLOADER_APP_ROLLBACK_ENABLE option. In this case, you need to call the following APIs in your ESP32 firmware.
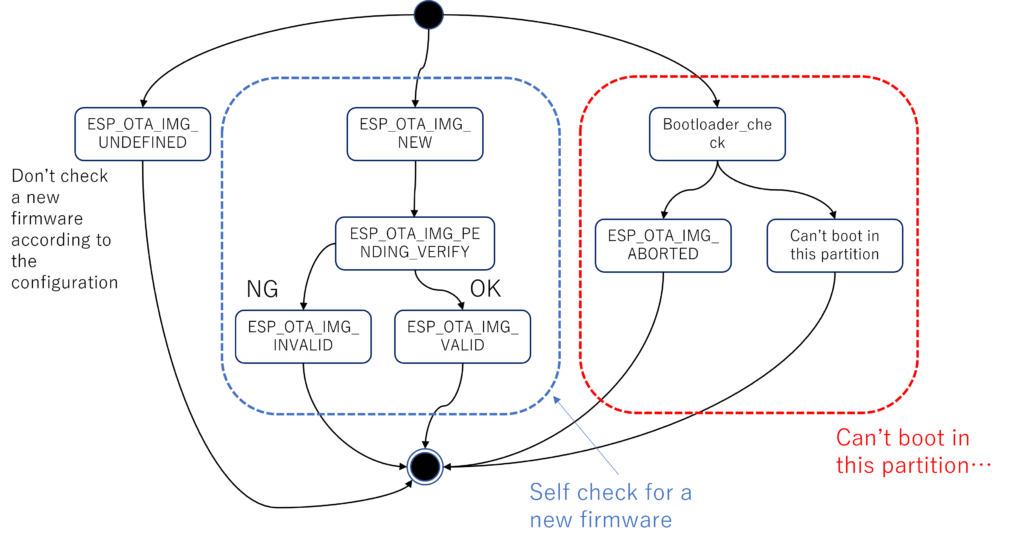
esp_ota_set_boot_partition():When downloading your new ESP32 firmware finished, this API has to be called so that your ESP32 will boot using the new firmware next time.- In the app_main function in your new firmware, you can check if the firmware works correctly so that some peripheral sensors are read. If you succeed to get the values of the sensors, call the
esp_ota_mark_app_valid_cancel_rollback()so that the new firmware will be used subsequently (it is marked ESP_OTA_IMG_VALID). - In case you can’t work your new firmware as you want, call the
esp_ota_mark_app_invalid_rollback_and_reboot()so that you can use the previously installed firmware next time you want to boot the system (it is marked ESP_OTA_IMG_INVALID).
The following state machine indicates how the functionality works.
Embed the HTTPS Server’s public key into your application
The OTA update function typically uses HTTPS connection to update a software, so you need to have your ESP32 application embedded the HTTPS server’s public key. To do this, please edit the CMakefile.txt at the top of your application project so that the public key can be embedded at the end of the program (Note: ca_cert.pem is equivalent to the server_cert.pem mentioned above).
idf_component_register(SRCS "${srcs}"
    INCLUDE_DIRS "."
    EMBED_TXTFILES ${project_dir}/server_certs/ca_cert.pem
A C or C++ program can read this embedded public key by defining the following variable.
extern const uint8_t server_cert_pem_start[] asm(“_binary_ca_cert_pem_start”) ;
HTTP Client in your ESP32 embedded IoT program
Now, you can use the server_cert_pem_start variable in your updating client program. You must implement some https client code in your application to receive the binary image of a new firmware. The espressif corporation has implemented some OTA example programs. You can see them and adjust them to what you want to do.
By default, you have to match the CN value and the server name (or IP address) you specify to connect to update the program. Otherwise, you will see an OTA update procedure failed…